

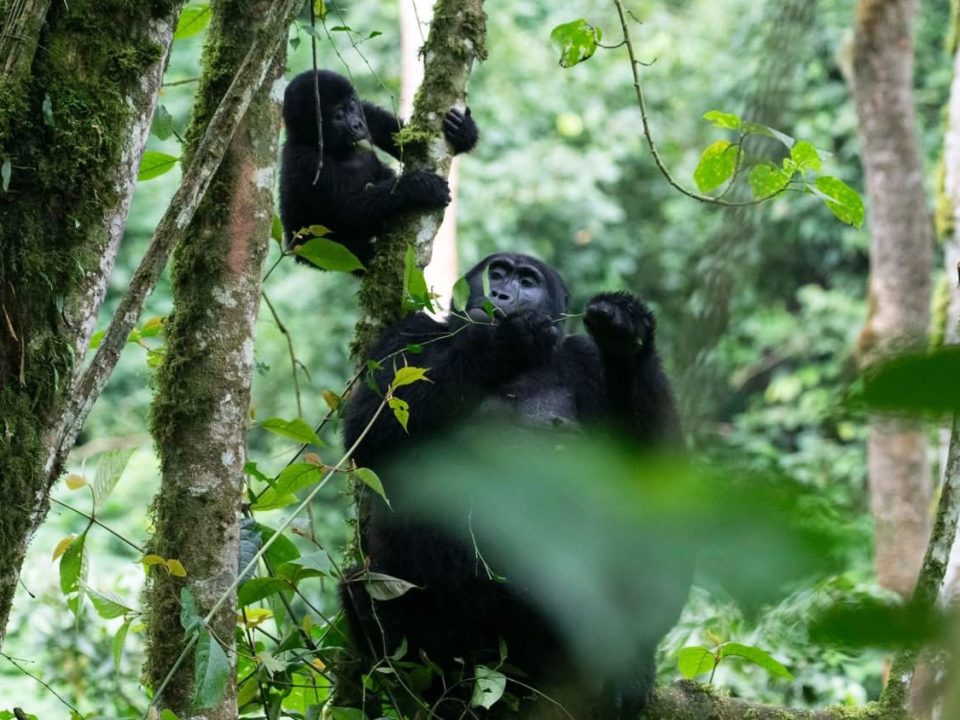
Gorilla trekking photography tips are among the most searched and most discussed topics in wildlife photography — and for good reason. The gorilla trekking photography challenge is unique: dense dark rainforest lighting fast-moving unpredictable subjects a strict one-hour time limit no flash allowed and the emotional intensity of the encounter itself all conspire to make gorilla photography genuinely demanding.
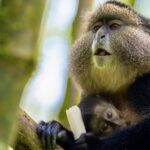
But the rewards are extraordinary. A great gorilla photograph — a silverback’s eyes meeting the lens in perfect focus a mother nursing her infant in dappled forest light young gorillas mid-wrestle in the canopy — is among the finest wildlife images a photographer can achieve anywhere on Earth.
This complete gorilla trekking photography tips guide covers everything you need — camera settings lenses preparation lighting composition and the specific techniques that consistently produce extraordinary gorilla photographs in Rwanda and Uganda.
“For the complete East Africa photography planning guide read our East Africa photography safari guide.”
The Gorilla Trekking Photography Challenge
Before diving into specific gorilla trekking photography tips it helps to understand exactly what makes gorilla photography challenging — so you can prepare properly:
Low light: Dense Afromontane rainforest filters out most direct sunlight. Even on bright days the forest floor and lower canopy where gorillas spend most of their time can be surprisingly dark — requiring high ISO settings fast lenses or both.
No flash: Absolutely prohibited. Flash disturbs the gorillas and using it will result in immediate removal from the trek. All gorilla photography must work within available natural light — no exceptions.
One hour time limit: You have exactly 60 minutes with the gorilla family. There is no second chance no return visit. Every minute matters and the pressure to maximise your images in the available time is real.
Unpredictable subjects: Gorillas move constantly — feeding moving between resting spots adjusting position. Unlike a posed studio subject gorillas do exactly what they want when they want. Anticipating and reacting to their movement is the core gorilla photography skill.
Vegetation obstruction: Dense forest vegetation constantly places leaves branches and bamboo between you and the gorillas. Finding clear sight lines is a continuous challenge during the hour.
Emotional intensity: Many photographers find the gorilla encounter so overwhelming that they struggle to focus on technical photography. Being technically prepared before you arrive — settings dialled in muscle memory engaged — frees you to respond emotionally AND photographically.
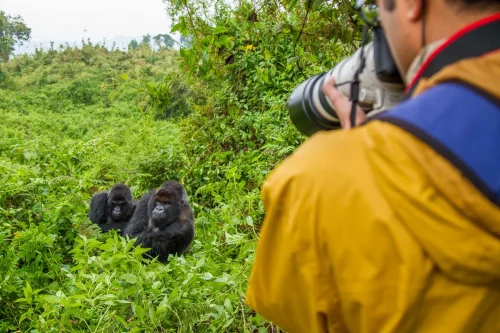
Distance rules: You must maintain 7 metres minimum distance from gorillas at all times. Rangers enforce this strictly. The distance actually works well for photography — 7 metres with a 200–400mm lens gives you frame-filling portraits — but it requires lens preparation rather than close approach.
Understanding these challenges is the first of our gorilla trekking photography tips — because preparation is everything.
Camera Equipment for Gorilla Trekking Photography
The Best Camera for Gorilla Trekking
Any modern camera with good low-light performance will produce excellent gorilla photographs. The specific brand matters far less than the photographer’s knowledge of their own equipment.
DSLR cameras — Canon 5D Mark IV Canon R5 Nikon D850 Nikon Z7 II — all outstanding for gorilla photography. Large sensors excellent high-ISO performance and excellent lens ecosystems.
Mirrorless cameras — Sony A7 IV Sony A9 III Nikon Z9 Canon R3 — the current generation of mirrorless cameras offer exceptional high-ISO performance fast autofocus tracking and silent shutters. Excellent for gorilla photography.
Micro Four Thirds — Olympus OM-1 Panasonic G9 — good high-ISO performance excellent image stabilisation and smaller lighter bodies. The crop factor gives effective reach advantage on longer lenses.
Smartphone cameras — modern flagship smartphones (iPhone 15 Pro Samsung S24 Ultra Google Pixel 8 Pro) produce genuinely impressive gorilla photographs in good light. In low forest conditions they struggle more than dedicated cameras — but are perfectly viable for most travellers.
Key camera specifications that matter most for gorilla photography:
- High-ISO performance (ISO 3200–12800 usable)
- Fast autofocus tracking
- Silent shutter mode (essential — no shutter noise near gorillas)
- Good image stabilisation (IBIS)
- Fast burst rate (8+ fps useful)
The Best Lenses for Gorilla Trekking
The most important gorilla trekking photography tip about lenses: bring one versatile zoom rather than multiple primes — you will be moving continuously and changing lenses in a dense forest with a 60-minute time limit is not practical.
The ideal gorilla trekking lens:
70–200mm f/2.8 — the single best gorilla trekking lens for most photographers. The f/2.8 maximum aperture gathers significantly more light than slower zooms — critical in dark forest conditions. 200mm gives excellent portrait reach while 70mm captures environmental shots showing gorillas in forest context. Relatively compact and manageable in forest terrain.
100–400mm f/4.5–5.6 (or equivalent) — excellent for reaching gorillas at greater distance and for tighter portraits. The slower aperture requires higher ISO or slower shutter speeds in low light — a trade-off worth understanding before you go.
24–70mm f/2.8 — useful if gorillas are very close (which does happen) or for wide environmental shots showing the forest setting. Less useful as a primary gorilla lens — 70mm is often not enough reach at 7-metre minimum distance.
Teleconverters — a 1.4x converter on a 70–200mm f/2.8 gives 98–280mm f/4 — useful extra reach at a manageable light cost. A 2x converter gives too much aperture loss in low forest light.
What NOT to bring:
- Super-telephoto prime lenses (400mm f/2.8 500mm f/4) — too heavy and bulky for rainforest trekking
- Multiple camera bodies — impractical and heavy on long gorilla treks
- Ring flash or any flash equipment — prohibited and unnecessary
Additional Equipment
Extra batteries — essential Cold forest temperatures drain batteries faster than normal. Bring minimum 2 fully charged spare batteries for every camera body. Charge everything fully the night before your trek.
Extra memory cards — essential You will shoot hundreds of frames in 60 minutes. Bring minimum 2 large capacity memory cards (64GB+) formatted and ready. Running out of card space during the gorilla encounter is heartbreaking.
Waterproof protection Forest rain and humidity can damage electronics. Carry your camera in a waterproof bag between sightings. A rain cover for your camera body is strongly recommended especially in wet season. Read our complete gorilla trekking packing list for full gear recommendations.
Lens cleaning cloth Forest humidity causes lens fogging. A microfibre cloth for quick lens cleaning is essential.
Monopod (optional) A lightweight monopod provides image stabilisation support on longer lenses without the bulk and terrain difficulty of a tripod. Some gorilla trekking photographers find it helpful — others prefer freedom of movement.
Camera Settings for Gorilla Trekking Photography
Dialling in your settings before you reach the gorilla family is one of the most important gorilla trekking photography tips — fumbling with menus during your precious 60 minutes costs irreplaceable shots.
The Core Settings
Shutter Speed: 1/500–1/1000 second minimum This is the most critical setting for gorilla photography. Gorillas move more than you expect — even a resting gorilla shifts weight turns its head and scratches constantly. A shutter speed of 1/500 freezes most gorilla movement. For moving gorillas and active young animals use 1/800–1/1000.
Aperture: f/2.8–f/4 As wide as your lens allows — to maximise light gathering in the dark forest and to create pleasing background separation (bokeh) that makes your gorilla subjects pop from the forest background.
ISO: Auto with ceiling 12800 Set your ISO to Auto and let the camera choose within your ceiling. Modern cameras handle ISO 6400–12800 very well — the slight grain at high ISO is far preferable to motion-blurred gorilla images from too-slow shutter speeds. Test your camera’s high-ISO performance before the trip so you know what is acceptable.
Autofocus: Continuous tracking AF (AI Servo / AF-C) Continuous autofocus tracking keeps focus on moving subjects between frames. Eye-tracking AF — available on most modern mirrorless cameras — is extraordinary for gorilla portraits: point at a gorilla face and the camera locks focus on the eye automatically.
Drive mode: High-speed burst (8–20 fps) Shoot in bursts of 3–5 frames rather than single shots. Reviewing a burst and selecting the sharpest most expressive frame gives dramatically better results than trying to time perfect single shots.
White balance: Auto or Shade Auto white balance works well in most forest conditions. Shade preset warms the image slightly — useful in the blue-green forest light that can make gorilla images look cold.
Metering: Evaluative/Matrix The camera’s standard evaluative metering handles most gorilla lighting situations well. In very contrasty light (dappled sunlight through the canopy) use spot metering on the gorilla’s face to ensure correct exposure on the subject.
Silent shutter: ON This is one of the most important gorilla trekking photography tips that photographers often overlook. The mechanical shutter on DSLRs and some mirrorless cameras makes a loud click that can disturb gorillas. Use electronic silent shutter mode — now available on virtually all modern mirrorless cameras and many DSLRs. Silent shutter allows continuous burst shooting with zero noise.
Image stabilisation: ON Body and lens stabilisation should both be active — particularly useful for hand-held shots at slower shutter speeds and with longer focal lengths.
Quick Settings Summary Card
Print this and keep it in your camera bag:
| Setting | Value |
|---|---|
| Shutter speed | 1/500–1/1000 |
| Aperture | f/2.8–f/4 |
| ISO | Auto (max 12800) |
| Autofocus | Continuous tracking |
| Drive mode | High burst |
| White balance | Auto or Shade |
| Metering | Evaluative |
| Silent shutter | ON |
| Image stabilisation | ON |
| Flash | OFF (always) |
Lighting for Gorilla Trekking Photography
Light is the single most important variable in gorilla trekking photography — and the one element you cannot control. Understanding how to work with forest light is one of the most valuable gorilla trekking photography tips.
The Challenge of Forest Light
Afromontane rainforest creates complex mixed lighting conditions — patches of bright direct sunlight alternate with deep shade creating high-contrast scenes that are challenging for any camera to expose correctly.
Direct sunlight on a gorilla: Creates harsh shadows on the face and body — often unflattering and technically difficult. Side light can be beautiful but direct overhead sun creates racoon-eye shadows.
Open shade: The best light for gorilla photography — soft even illumination with no harsh shadows. Overcast days are often better than bright sunny days for gorilla photography because cloud diffuses the harsh direct sun into beautiful soft even light.
Dappled light: Sunlight filtering through gaps in the canopy creates beautiful pools of warm light — the classic gorilla photography look. When a gorilla moves into a dappled light patch be ready for extraordinary shots.
Deep shade: Very challenging — requires maximum ISO wide aperture and may still produce soft images. Accept that some gorilla positions in deep shade will not be technically perfect.
Working with Available Light
Position yourself for the best light — as your group moves with the gorillas constantly assess the light direction relative to your subjects. Try to position yourself so the light falls on the gorilla’s face rather than backlighting the subject.
Shoot when gorillas move to better light — gorillas move continuously and frequently shift from shade to better-lit positions. Anticipate this movement and be ready when they emerge into good light.
Use exposure compensation — in very dark forest conditions your camera may overexpose to compensate for the dark background. Dial in -0.3 to -1.0 stop of exposure compensation to prevent blown highlights on lighter gorilla faces.
Embrace high ISO — do not be afraid of ISO 6400 or 12800 in dark forest conditions. A sharp image at high ISO is always better than a blurred image at low ISO. Noise can be reduced in post-processing; motion blur cannot be fixed.
Composition for Gorilla Trekking Photography
Great gorilla trekking photography tips go beyond technical settings to the artistry of composition — how you frame your subjects to create compelling memorable images.
The Essential Gorilla Shots
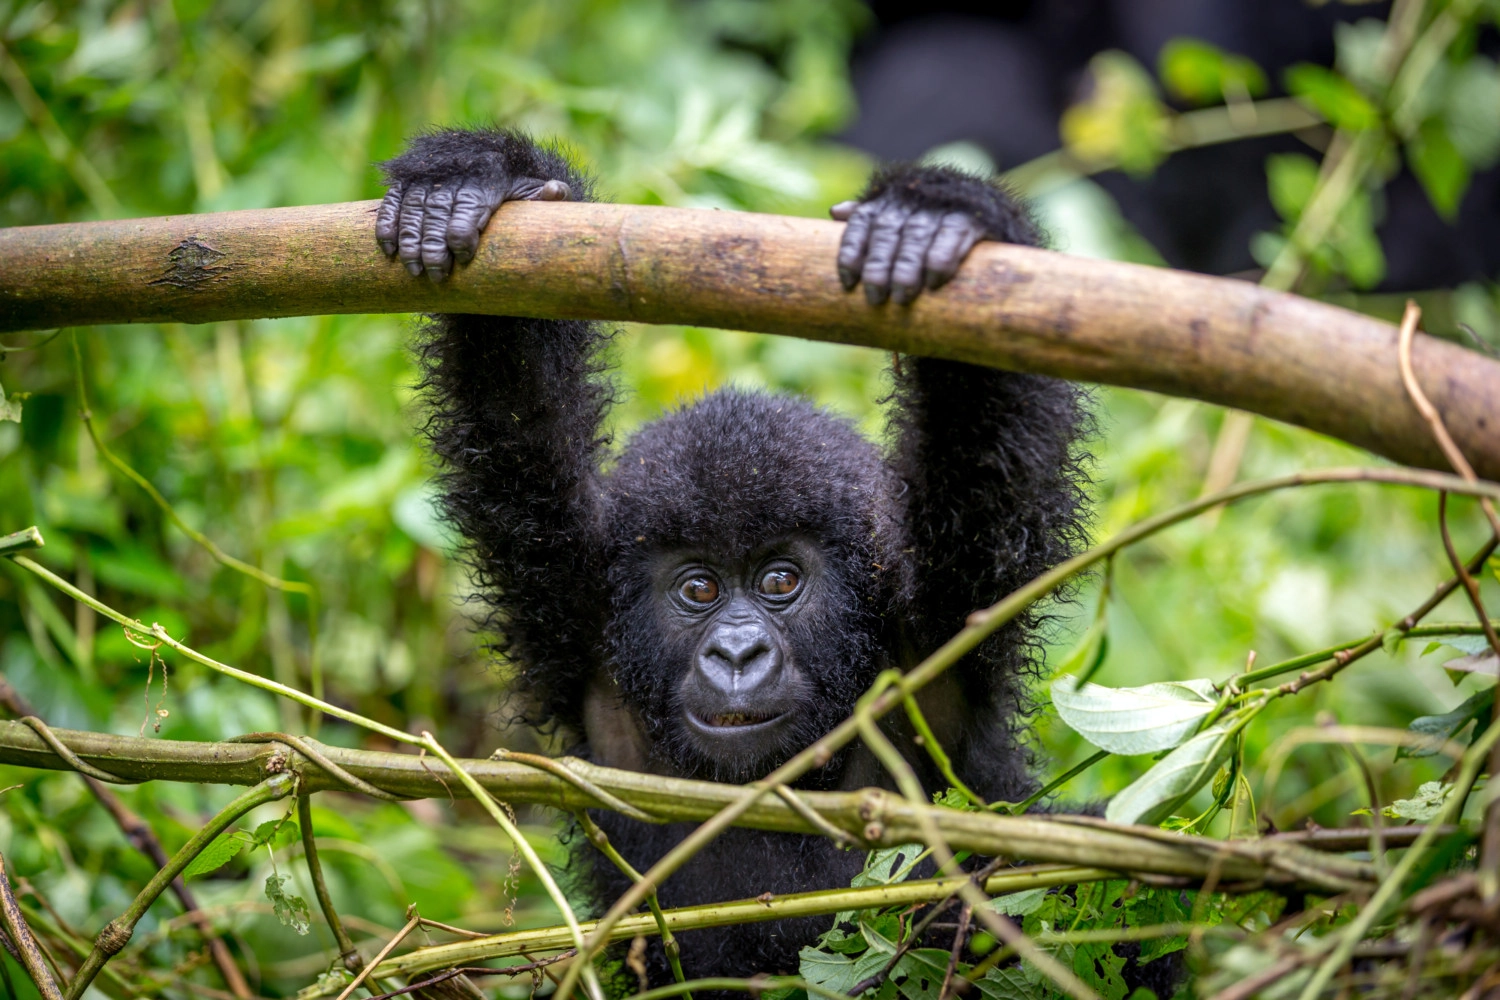
The Portrait — Eyes in Focus The most powerful gorilla photograph is a tight portrait with the gorilla’s eyes in sharp focus. Eyes are the primary connection point between viewer and subject. Use your longest focal length position yourself at gorilla eye level and wait for a moment of stillness.
The Silverback — Power and Presence The dominant silverback is the most photographed gorilla subject. Wait for moments when the silverback is in good light and include enough of the massive body to convey scale and power. A silverback with direct eye contact is one of the most compelling images in wildlife photography.
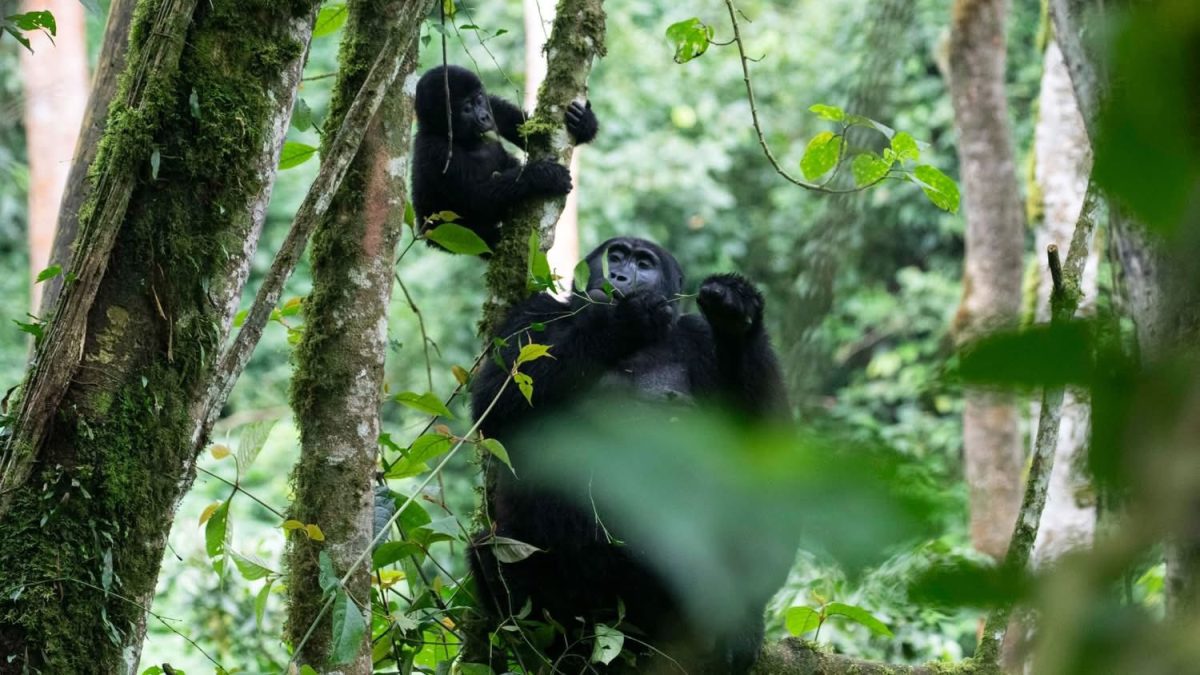
The Mother and Infant The most emotionally resonant gorilla photographs — a mother nursing her infant or an infant clinging to its mother’s back. These images communicate the gorillas’ deep family bonds in a way that connects viscerally with viewers.
The Action Shot Gorillas playing feeding moving between positions — dynamic action shots showing gorillas in motion. Use fast shutter speed and burst mode to capture sharp images mid-movement.
The Environmental Shot Pull back to a wider focal length and show the gorilla family in their forest environment — ancient trees bamboo and green vegetation framing the gorillas. These shots provide context and tell the story of the ecosystem.
The Group Shot When multiple gorilla family members are visible in the same frame capture the social dynamics — a silverback watching while young gorillas play a mother with infant while juveniles wrestle nearby.
Composition Principles
Rule of thirds — place the gorilla’s eyes at one of the four rule-of-thirds intersection points rather than dead centre. Creates more dynamic and visually interesting compositions.
Fill the frame — get as much gorilla in your frame as your lens allows. Empty forest around a small gorilla wastes the power of the subject.
Eye level — crouch or kneel to bring your lens to the gorilla’s eye level. Shooting down on animals produces less powerful images than shooting at their level.
Look for leading lines — bamboo stalks tree trunks and branches can lead the viewer’s eye toward the gorilla subject. Use forest elements as compositional tools rather than fighting them.
Include context — occasionally pull back and show the gorillas in their forest environment. Not every shot needs to be a tight portrait.
Wait for expression — the most powerful gorilla portraits capture a moment of expression — a direct gaze a yawn showing teeth a moment of play or grooming. Patience and burst shooting together produce these magical moments.
Practical Photography Tips for Your Gorilla Trek Day
The Night Before
Charge all batteries — fully charge every camera battery and backup. Cold forest temperatures drain batteries faster than normal.
Format memory cards — format all cards in-camera to ensure they are clean and working correctly.
Set your camera settings — dial in the settings from our guide above before you go to bed. You want muscle memory not menu searching during the encounter.
Test silent shutter — make sure you know how to activate silent shutter on your specific camera model. Practice until it is automatic.
Clean your lens — dust and smears on the front element significantly reduce image sharpness. Clean thoroughly the night before.
At the Briefing
Confirm flash is OFF — check and double-check. Flash is the one photography rule with zero tolerance.
Ask your ranger about light — experienced rangers often know the habits of specific gorilla families — which trees they favour which direction they typically face. This information helps you anticipate where to position yourself for the best light.
Understand the family — knowing how many gorillas are in the family how many infants there are and where the silverback typically positions himself helps you prepare mentally for the photography opportunities.
During the Trek
Keep your camera accessible — do not put your camera in your bag during the trek. Gorillas are sometimes encountered before the group expects them. Keep your camera on your shoulder or around your neck ready to shoot.
Conserve battery during the trek — turn your camera off between the briefing and the gorilla encounter to conserve battery. Turn it on as you approach the family.
Focus on the ground — photograph interesting birds plants and forest details during the trek. This keeps your eye active and your camera handling sharp before the main event.
During the Encounter
Shoot immediately — the first moments of the encounter while the gorillas are curious and engaged before they settle back into their routine are often the best photography moments. Start shooting immediately.
Move constantly for light — don’t stay in one spot. Constantly assess the light and vegetation between you and the gorillas and reposition for the best angles.
Vary your focal length — shoot tight portraits at 200mm+ and wider environmental shots at 70–100mm. A variety of focal lengths in your edit gives you more options.
Watch the silverback — the silverback’s behaviour dictates the family’s movements. Watch where he goes and be ready to shoot when he moves into good light.
Shoot the family dynamics — not just individual portraits. The interactions between family members — grooming playing feeding nursing — tell the story of gorilla social life.
Manage your time — with 60 minutes available resist the urge to shoot constantly. Some of the best gorilla photographers spend time just watching and shoot selectively when truly great moments occur.
Stay calm — if a gorilla charges (rare but occasionally happens) stay still crouch down and do not raise your camera. Rangers manage these situations. A camera raised during a charge can escalate the situation.
After the Hour
Don’t stop shooting immediately — as the group moves away from the gorilla family continue shooting. The retreat through the forest sometimes produces unexpected shots as gorillas move to different positions.
Check your shots — briefly review your best images in-camera to confirm you have what you wanted before the emotion of the experience fades.
Post-Processing Gorilla Trekking Photography Tips
Shoot in RAW format — not JPEG. RAW files retain maximum image information for post-processing — particularly important for recovering shadow detail in dark forest conditions and managing high-ISO noise.
Key post-processing adjustments for gorilla images:
Exposure — often needs a slight positive adjustment (+0.3 to +0.7 stops) to lift shadow detail in dark forest shots.
Shadows — lift shadows significantly to reveal detail in the darker areas of gorilla bodies and forest background.
Highlights — reduce highlights to manage any blown areas in bright patches of light.
Clarity and texture — moderate increases reveal the extraordinary detail of gorilla fur and facial features.
Noise reduction — high-ISO forest images need careful noise reduction. Luminance noise reduction (moderate to heavy) combined with colour noise reduction (moderate) produces clean results. Lightroom’s AI Denoise feature works exceptionally well on high-ISO gorilla images.
Sharpening — careful output sharpening particularly on the gorilla’s eyes enhances the connection in portrait images.
Colour — forest light often creates a green colour cast. Slight adjustments to white balance toward warmer tones and reducing green saturation produces more natural-looking gorilla skin tones.
Gorilla Photography in Rwanda vs Uganda — Key Differences
Both Rwanda and Uganda offer extraordinary gorilla photography opportunities — but the conditions differ in important ways:
Rwanda — Volcanoes National Park
- Forest density: Generally less dense than Bwindi — slightly more open sight lines
- Light: Often better than Uganda due to less dense canopy in some areas
- Terrain: Steep volcanic slopes — you are often shooting uphill at gorillas
- Trek duration: Generally shorter — more time and energy for photography
- Gorilla families: 12 habituated families — good variety of photography opportunities
Uganda — Bwindi Impenetrable Forest
- Forest density: Very dense — more vegetation between you and gorillas
- Light: Often darker than Rwanda due to dense canopy
- Terrain: Very steep and demanding — more challenging to maintain stable shooting position
- Trek duration: Often longer — can be tired by the time you reach the gorillas
- Gorilla families: 19 habituated families — more variety and availability
Photography verdict: Rwanda offers marginally better photography conditions for most photographers — better light more accessible terrain and slightly more open forest. Uganda offers more raw and dramatic forest atmosphere — darker moodier more atmospheric images.
Both are extraordinary. For dedicated photographers we recommend combining both destinations for the complete gorilla photography experience.
Read our gorilla trekking Rwanda vs Uganda complete guide for the full destination comparison.
Gorilla Photography Ethics
As a wildlife photographer in gorilla trekking you have responsibilities that go beyond making great images:
Never use flash — ever. This is both a rule and an ethical responsibility. Flash startles and distresses gorillas.
Respect the 7-metre rule — do not try to move closer for a better shot. The distance rule exists to protect gorilla health and wellbeing.
Follow ranger instructions immediately — when a ranger signals you to move or stop photographing do so immediately without question.
Put the camera down sometimes — the best gorilla photographers also spend time simply being present without a viewfinder between them and the gorillas. Some of the most profound gorilla encounters happen when you lower the camera.
Do not share location data — when posting gorilla images online remove GPS location data from your image files. Sharing specific gorilla location data can compromise security.
Support conservation — share your gorilla images responsibly. Every powerful gorilla photograph has the potential to educate and inspire others to support gorilla conservation. Use your images to tell the conservation story.
Book Your Gorilla Photography Safari with Go Safaris Africa
Go Safaris Africa arranges gorilla trekking safaris specifically tailored for photographers — including advice on the best gorilla families for photography opportunities the best lodges near the parks and the best seasonal conditions for gorilla photography.
- 👉 Plan your gorilla photography safari
- 👉 View Rwanda gorilla safari packages
- 👉 View Uganda gorilla safari packages
- 👉 Book your gorilla permit
📞 Call or WhatsApp: +250 788 365 595 📧 info@gosafarisafrica.com 🌐 www.gosafarisafrica.com
Frequently Asked Questions
What camera settings should I use for gorilla trekking photography? Use 1/500–1/1000 shutter speed f/2.8–f/4 aperture auto ISO (max 12800) continuous autofocus tracking high burst mode and silent shutter ON. See our complete settings guide above for full details.
What is the best lens for gorilla trekking photography? A 70–200mm f/2.8 is the single best gorilla trekking lens — versatile fast enough for dark forest conditions and manageable on long treks. A 100–400mm offers more reach but at slower aperture. See our complete lens guide above.
Can I use flash for gorilla trekking photography? Absolutely not — flash is strictly prohibited and using it results in immediate removal from the trek. All gorilla photography must use available natural forest light.
Is a smartphone sufficient for gorilla trekking photography? Modern flagship smartphones produce excellent gorilla photographs in reasonable light. In dark forest conditions dedicated cameras with large sensors and fast lenses outperform smartphones significantly. A smartphone is perfectly adequate for most travellers — a dedicated camera gives professional photographers more control.
What is the biggest gorilla trekking photography mistake? Using too slow a shutter speed and getting blurry images. Set your minimum shutter speed to 1/500 and trust your camera to raise ISO accordingly. Read our complete gorilla trekking photography tips guide above for the full technical approach.
Is gorilla trekking photography easier in Rwanda or Uganda? Rwanda’s Volcanoes National Park generally offers slightly better photography conditions — less dense forest better light and easier terrain. Uganda’s Bwindi Impenetrable Forest produces moodier more atmospheric images. Both are extraordinary. Read our Rwanda vs Uganda comparison.
Should I bring a tripod for gorilla trekking photography? No — a full tripod is impractical in dense rainforest on steep terrain. A lightweight monopod can be useful for longer lenses. The best option is a camera with excellent IBIS (in-body image stabilisation) and a fast lens.
Go Safaris Africa is a Kigali-based safari operator specialising in gorilla trekking wildlife safaris and tailor-made adventures across Rwanda Uganda Kenya and Tanzania. 📍 Prince House Second Floor Office #5 Kigali Rwanda 📞 +250 788 365 595 | 🌐 www.gosafarisafrica.com
